When it comes to ampscript, there are a lot of things to remember. But with this handy cheatsheet, you’ll be able to easily reference the most important parts of ampscript. This guide will cover all of the basics, including variables, functions, and operators.
So whether you’re just getting started with ampscript or you’re a seasoned pro, this guide will be a valuable resource.
As a marketer, it’s important to have a working knowledge of all the different tools and technologies at your disposal. And while there are plenty of resources out there to help you learn about Ampscript, it can be helpful to have a quick reference guide on hand. That’s why we’ve put together this handy Ampscript cheatsheet.
This cheat sheet covers all the basics of Ampscript, including:
– How to create variables
– How to use operators
– How to write IF/THEN statements
Introduction to AmpScript in Salesforce Marketing Cloud | #Salesforce
Credit: developer.salesforce.com
What is Ampscript Used For?
AMPscript is a server-side scripting language used for marketing applications such as email personalization, dynamic content, and SMS messaging. It is a powerful tool that allows marketers to control the message delivery to their audience. AMPscript can also be used to create custom reports and integration with third-party systems.
What is Ampscript in Sfmc?
What is AMPscript in Sfmc?
AMPscript is a scripting language used to customize content in Marketing Cloud emails, landing pages, and SMS messages. It can be used to insert dynamic content, personalize messages, and automate processes.
What is the Purpose of the Format Now () Yyyy )= Code Example?
The YYYY-MM-DD format code is an international standard for representing dates. It is most commonly used in software applications and databases, such as MySQL. The purpose of this code is to unambiguously represent dates so that they can be easily compared and sorted.
How Can Ampscript Customize Email Messages?
Email personalization is a must in order to stand out in today’s crowded inboxes. AMPscript is a powerful tool that marketers can use to customize their email messages and create more relevant, engaging content for their subscribers. Here are some ways that you can use AMPscript to personalize your emails:
1. Use subscriber data to segment your list and send targeted content.
2. Insert personalized images or videos into your email content.
3. Use dynamic subject lines that change based on the subscriber’s interests or purchase history.
4. Create personalized calls-to-action that drive subscribers to relevant landing pages or offers.
5. Include countdown timers or other time-sensitive elements to create a sense of urgency and encourage conversions.
Conclusion
If you’re new to ampscript, this cheatsheet is a great resource to help you get started. It covers the most important functions and syntax for ampscript, and provides examples of how to use them. With this cheat sheet, you’ll be able to quickly get up to speed on ampscript so that you can start using it in your own marketing campaigns.
If you’re working with Anaconda, then you’ll want to know about some of the most important features and how to use them. This cheat sheet will help you get started.
Anaconda is a distribution of Python, R, and other packages that are used for data science and machine learning.
It’s available for free from Continuum Analytics. Anaconda includes over 100 of the most popular Python packages for data science, including NumPy, pandas, matplotlib, and scikit-learn.
If you’re working with the Anaconda distribution of Python, you’ll want to keep this handy cheat sheet close by. It covers the most important topics for working with Anaconda, including managing packages, environments and channels.
Package Management:
conda install [package] # install a package from Anaconda’s default channel
conda install [package] -c [channel] # install a package from a specific channel
conda remove [package] # remove a package
conda update [package] # update a package
conda list # list all installed packages
Environment Management:
conda create –name [env name] python=[python version] # create a new environment
source activate [env name] # activate an environment (Mac/Linux)
Anaconda Beginners Guide for Linux and Windows – Python Working Environments Tutorial
Conda Install -C
Pypi
If you’re new to Python, then the idea of installing packages can be a bit daunting. Fortunately, the Anaconda distribution makes it easy to install packages and keep them up-to-date.
In this blog post, we’ll walk through how to use the conda command to install a package from the PyPI repository.
First, make sure that you have Anaconda installed on your system. Then open a terminal (or Anaconda Prompt on Windows) and type the following:
conda install -c anaconda pypi
This will install the latest version of the PyPI package into your Anaconda environment. The -c option tells conda to use the anaconda channel instead of the default channel.
By default, conda will only search for packages in its own channels (e.g., https://repo.anacondaworkspaces/pkgs/main/ ). However, many popular Python packages are not available in these channels and must be installed from PyPI using pip . The -c option allows you to specify an alternate channel where conda should look for packages.
In this case we’re using anaconda , which is a channel maintained by Anaconda Workspaces that contains many popular Python packages (including those that are not available in other channels). You can find a list of all available channels at https://docs.anacondaworkspaces.com/user-guide/tasks/PackageChannels .
After running the conda install command, you should see something like this:
Package plan for installation in environment /Users/jsmith/anaconda3: Proceed ([y]/n)? y pypi-0 100% |###############################| Time: 0:00:00 1 MB/s Installing collected packages: pypi Successfully installed pypi-0 Cleaning up…
Credit: www.youtube.com
How Can I See All Conda Environments?
Assuming you are using the Anaconda distribution, there are a few ways to see what conda environments you have installed.
The first way is to use the command line. With Anaconda Prompt (or your system’s equivalent), simply type:
conda env list
This will show you a list of all the environments on your system, as well as their corresponding Python versions.
If you want more information about each environment, such as what packages are installed in them, you can use the ‘–verbose’ flag:
How Do I List Anaconda Packages?
If you want to list the packages in Anaconda, you can use the command line or Anaconda Navigator.
To list the packages using the command line, open a terminal and type:
conda list
This will print out a list of all the packages in your current environment, as well as their versions. You can also use wildcards to filter the results. For example, if you only want to see packages that start with “anaconda”, you would type:
conda list anaconda*
If you want to list the packages in Anaconda Navigator, go to the Environments tab and select your current environment. This will open a new page that shows all of the installed packages in that environment.
You can also use the search bar to filter the results.
Is Pip Included in Anaconda?
No, pip is not included in Anaconda. However, Anaconda’s package manager, conda, can be used to install pip.
How Do You Clone the Environment in Anaconda?
Anaconda is a distribution of Python and R that includes over 100 popular packages for data science. It is available for free and runs on all major operating systems. Anaconda can be used to clone your environment so that you can have an identical copy of all the packages and their dependencies.
This is useful if you want to share your environment with others or if you want to create a new environment with the same packages as an existing one.
To clone your environment in Anaconda, first open the Anaconda Prompt and type the following command:
conda create –name myenv –clone myoldenv
Replace “myenv” with the name of your new environment and “myoldenv” with the name of the old one. This will create an exact copy of your old environment in a new one. You can then activate it by typing:
Conclusion
If you’re new to the Anaconda distribution of Python, then this cheat sheet is for you. It covers the most important aspects of getting started with Anaconda, including installing it, setting up your environment, and working with popular data science tools such as Jupyter Notebooks.
Installing Anaconda is simple and only takes a few minutes.
You can download it from the official website or use a package manager like Homebrew on macOS. Once installed, you’ll need to create a new conda environment to get started. This can be done using the command line or by using the Anaconda Navigator GUI.
Once your environment is set up, you can start working with data science tools like Jupyter Notebooks. The Anaconda distribution includes many popular packages such as NumPy, pandas, and matplotlib that make working with data easier. You can also install additional packages using conda or pip.
Whether you’re just getting started with Python or are looking for a quick reference, this cheat sheet will help you get up and running with Anaconda quickly and easily.
In this blog post, we’ll be providing you with an Arduino code cheat sheet. This will be a quick reference guide for some of the most commonly used commands in Arduino. We’ll also provide a brief description of what each command does.
By the end of this blog post, you should have a better understanding of how to use Arduino code and be able to more easily write your own sketches.
If you’re just getting started with Arduino, coding can seem like a daunting task. But don’t worry – we’ve got you covered with this handy cheat sheet! This guide covers the basics of programming in Arduino, including variables, data types, functions, and more.
After reading this guide, you’ll be able to write your own Arduino code in no time.
Arduino Code Examples
If you’re just getting started with Arduino, code examples can be a great way to learn about the platform and all it’s capabilities. In this blog post, we’ll take a look at some of the best Arduino code examples available online. We’ll also provide a brief overview of what each example does, so you can get started using them right away.
One of the most popular Arduino code examples is the Blink sketch. This simple sketch turns an LED on and off repeatedly, making it perfect for testing purposes. You can find the Blink sketch in the File > Examples > 01 Basics menu in the Arduino IDE.
Another great example is the Fade sketch. This one fades an LED up and down in brightness, providing a smooth transition between states. You can find it under File > Examples > 02 Analog in the Arduino IDE.
If you’re looking for something more complex, check out the Servo sweep sketch. This one uses a servo motor to sweep back and forth continuously. You can access it from File > Examples > 03 Control in the Arduino IDE.
These are just a few of the many excellent code examples available for Arduino users.
Credit: wallpaperaccess.com
How Do I Write an Arduino Code?
Assuming you would like a 101 on programming Arduinos:
Arduino is an open-source electronics platform based on easy-to-use hardware and software. It’s intended for anyone making interactive projects.
The Arduino code itself is not too dissimilar to C++, so if you have any experience with other coding languages, it should not be too difficult of a transition. That being said, let’s go over the basics of how to write a simple Arduino sketch.
Every Arduino sketch must have two functions: setup() and loop().
setup() is run once when the sketch starts. We use this function to initialize variables, set pin modes, start using libraries, etc.
It’s good practice to keep your setup() function small and concise.
Here is an example of what a typical setup function might look like:
void setup(){ // runs once when the sketch starts
Serial.begin(9600); // sets up Serial communication at 9600 baud
pinMode(13, OUTPUT); // sets digital pin 13 as an output
What are the Commands Used for Arduino?
In Arduino, there are two types of commands: function and action. Functions are defined in the library, while actions are called by the main sketch.
The most common function is pinMode().
This sets a pin as either an INPUT or OUTPUT. For example, pinMode(13, OUTPUT); would set digital pin 13 as an output. Other functions include digitalWrite(), which writes a HIGH or LOW value to a digital pin; analogRead(), which reads the value from an analog input; and delay(), which pauses the program for a certain amount of time (measured in milliseconds).
Actions are called within the main loop of the sketch and typically use control flow statements like if/else or for loops. For example, you could use an if statement to turn on an LED when a button is pressed:
if (digitalRead(buttonPin) == HIGH) {
Arduino is a computer programming language based on C and C++. It is a cross-platform language that can be used on Windows, Mac, and Linux operating systems. Arduino is an open source project, which means that anyone can contribute to its development.
Is Arduino in C Or C++?
Arduino is a programming language based on C++. It was created in order to make it easy for people to program microcontrollers, which are used in Arduino boards. The Arduino IDE uses a simplified version of C++, and adds some features that make it easier to work with microcontrollers.
arduino cheat sheet 1
Conclusion
If you’re new to Arduino, or programming in general, the vast array of code snippets and example sketches can be daunting. This cheat sheet will help you understand and remember the most important aspects of coding with Arduino.
Arduino is a flexible platform that can be used for a wide variety of projects.
The heart of every Arduino project is the sketch, which is written in the Arduino programming language. Sketches are made up of two parts: setup and loop.
The setup function runs once when the sketch starts, and is used to initialize variables, pin modes, etc.
The loop function runs continuously after setup has finished, making it perfect for reading sensors, controlling motors, or anything else that needs to happen repeatedly.
Within the loop function, you can use various control structures like if/else statements and for loops to make your sketch do what you want it to do. There are also many built-in functions that make it easy to work with inputs and outputs, communication protocols like I2C and SPI, timers, etc.
Once you have a basic understanding of how sketches work, writing your own code becomes much easier. So get started today by checking out some example sketches and experimenting with the Arduino IDE!
If you’re like me, then you probably have a hard time remembering all the different Arduino commands. That’s why I’ve put together this handy cheat sheet with all the most important ones. Feel free to print it out and keep it next to your computer for quick reference.
First, let’s start with the basics:
The Arduino IDE is a program that allows you to write code and upload it to your Arduino board. It’s available for free from the Arduino website.
Once you have the IDE installed, open it and connect your Arduino board to your computer via USB. Then, go to File > Examples > 01.Basics and open the Blink sketch. This will blink the built-in LED on your board so you know everything is working properly.
If you’re just getting started with Arduino, or are looking for a quick reference guide, then this Arduino Commands Cheat Sheet is for you! It covers the most common commands and functions that you’ll need to know in order to get your projects up and running.
So bookmark this page, print it out, and keep it handy – because once you start using these commands, you’ll be an Arduino pro in no time!
Arduino Commands Pdf
If you’re just getting started with Arduino, or are looking for a comprehensive reference guide, this post is for you! We’ll go over all the basic commands that are available in the Arduino IDE, as well as provide links to more advanced documentation. By the end of this post, you should have a good understanding of how to use the Arduino IDE and be able to start writing your own sketches!
The first thing we’ll need to do is open up the Arduino IDE. Once it’s open, we’ll see the main window which looks like this:
At the top of the window, we have a menu bar with options like File, Edit, Sketch, Tools, etc.
Underneath that is the toolbar with buttons for common actions like compiling/uploading your sketch, opening/saving files, etc. And finally at the bottom of the window is the status bar which displays information about any currently open files and their location on your computer.
Now let’s take a look at some of the most commonly used menus and toolbar buttons.
Starting with the File menu, we have options for creating new sketches (or files), opening existing sketches, saving sketches, and exporting/printing them. The Edit menu contains all of your usual editing options like cut/copy/paste/undo/redo/find-replace. The Sketch menu has options for verifying (compiling) your sketch as well as uploading it to your connected Arduino board.
The Tools menu gives you access to various settings related to Board (which type of Arduino board you’re using), Programmer (if you’re using an external programmer), Serial Port (which port your Arduino is connected to), and Preferences (various other settings). Finally, there’s also a Help menu with links to documentation both on-line and locally installed on your computer.
Now let’s take a look at some of commonly used toolbar buttons starting from left to right.
The first button is “New” which lets you create a new sketch file; next is “Open” which allows you load an existing sketch file; after that is “Save” followed by “Export”; then we have “Verify” which compiles your code without uploading it; next is “Upload” which both compiles & uploads your code; finally there’s “Serial Monitor” which opens up a separate window that shows any data being sent from your sketch via the serial port.
Credit: www.cheat-sheets.org
What are the Commands Used for Arduino?
Arduino is an open-source electronics platform based on easy-to-use hardware and software. It’s intended for anyone making interactive projects.
The Arduino software is free and open source.
It runs on Windows, Mac OS X, and Linux. The environment is written in Java and based on Processing and other open-source software.
This document explains how to install the Arduino Software (IDE) on your computer.
These instructions apply to all versions of the Arduino IDE. If you’re using a version of the IDE prior to 1.5, please refer to the previous versions page.
Installing the Arduino Software
1) Download the latest version from the Arduino website: www.arduino.cc/en/Main/Software
2) Unzip or extract the downloaded file
3) Run the installer (double-click on arduino-xxx where xxx is the current version number).
You may need administrative privileges in order to run this installer correctly; if you get an error about insufficient permissions, try running it again from an administrator account or with sudo on Linux systems
4) Follow the prompts in order to complete installation 5) Once installed, launch Arduino from your computer’s applications menu 6) If you’re using Windows 7 or later, you will need to run through a few driver installation steps before connecting your board for programming: Plug in your board and wait for Windows to begin its driver installation process After a short delay, Windows will bring up a wizard asking how best to search for drivers Choose “Browse my computer for driver software” Navigate to and select the folder where you extracted or unzipped earlier Press “Next” Driver installation should now proceed automatically If everything goes according to plan, after pressing “Finish” in response to completion of these steps you will have successfully completed installing drivers necessary for communication between your development machine and your board!
Is Arduino in C Or C++?
Arduino is a programming language based on C++. It is a cross-platform language that can be used to create programs for microcontrollers, desktop computers and web servers.
How Do I Write an Arduino Code?
Assuming you would like a general overview of how to write code for Arduino:
The first step is to download the Arduino IDE, which is a software used to write and upload code to your Arduino board. Once the IDE is installed, open it and connect your Arduino board to your computer using a USB cable.
Once the board is connected, go to File > Examples > 01.Basics > Blink to open an example sketch. This will blink the onboard LED on and off. To upload this sketch to your board, click the Upload button in the top left corner of the IDE window.
If everything goes well, you should see the message “Done uploading” in the bottom left corner of the window.
Now that you’ve successfully uploaded a sketch, it’s time to start writing your own! The basic structure of an Arduino sketch is as follows:
void setup() {
// put your setup code here, to run once:
}
void loop() {
// put your main code here, to run repeatedly:
}
The setup() function is where you initialize variables, set pin modes, etc. It runs only once when you power up or reset your board. The loop() function runs continuously after setup() has finished running (i.e., it runs forever).
You can use delay() inside loop() if you need things happen at specific intervals (just be aware that this will cause everything else in loop() stop running while delay() counts down).
What Code Language is Arduino?
Arduino is a programming language based on a very simple hardware platform. It’s designed to make it easy for anyone to get started with electronics. Arduino code is written in C++ with an addition of special methods and functions, which are compiled and run on a microcontroller board.
arduino cheat sheet 1
Conclusion
The Arduino Commands Cheat Sheet is a handy reference for anyone who wants to use the popular microcontroller board. The sheet includes all of the most common commands, as well as a few less frequently used ones. It’s a great resource for anyone just getting started with Arduino, or for experienced users who want a quick refresher on the basics.
In life, we are constantly trying to find ways to make things easier. We look for cheat sheets to help us get through school, our jobs, and even our personal lives. However, finding cheat sheets is not always as easy as it seems.
Here are a few tips on how to find cheat sheets that can help you in your everyday life:
The internet is a great resource for finding cheat sheets. A simple search can yield a variety of results that can be helpful for whatever you may be working on.
However, it is important to be aware of the credibility of the source when using information from the internet.
Another way to find cheat sheets is through word-of-mouth. Ask around at work or school to see if anyone has any recommendations on where to find helpful information.
You may be surprised at how many people are willing to share their own personal tips and tricks with you.
There are also many books available that compile various cheat sheets together in one place. This can be a great option if you prefer having physical copies of information or if you want more comprehensive coverage on a certain topic.
The downside of this option is that it can be more expensive than other methods since you have to purchase the book itself.
Go to Google and search for the term “cheat sheets”
Browse through the results and look for a cheat sheet that is relevant to what you are looking for
Once you find a cheat sheet, bookmark it or save it so that you can easily access it later
Linux Find Cheat Sheet Pdf
There are a number of ways to find files on your Linux system. The most basic way is to use the “find” command, which allows you to search for files by name, size, type, and other criteria. However, “find” can be a bit tricky to use if you’re not familiar with it.
That’s why we’ve put together this handy cheat sheet with some of the most common “find” commands and their options.
If you’re just starting out with Linux, or if you need a quick refresher on how to use “find,” this cheat sheet should help you out. We’ll start with a few simple examples and then move on to more advanced usage scenarios.
Let’s get started!
The most basic way to use “find” is to specify the path of the directory you want to search in and then provide a search criterion. For example, if we wanted to find all files in the current directory that have the “.txt” extension, we could use this command:
$ find . -name ‘*.txt’
This would return a list of all “.txt” files in the current directory (and any subdirectories).
You can also use regular expressions with “find.” For example, let’s say we wanted to find all files that have either a “.jpg” or “.png” extension. We could do this using the following command:
$ find . -regex ‘.*\.
\(jpg\|png\)$’
This would return all “.jpg” and “.png” files in the current directory (and any subdirectories).
Credit: thebeautydepartment.com
Is Cheat Sheet Allowed?
There is no definitive answer to this question as it depends on the specific context and situation in which the term “cheat sheet” is being used. In general, a cheat sheet is simply a document or set of notes that provides concise and/or essential information about a particular subject. Depending on the context, cheat sheets can be seen as either helpful or cheating.
In some cases, such as exams or other assessments where time is limited, using a cheat sheet can be considered cheating because it gives the user an unfair advantage over others who are not using one. However, in other contexts such as learning new material or preparing for a presentation, having a cheat sheet can be seen as helpful because it allows the user to quickly reference key points.
Ultimately, whether or not using a cheat sheet is allowed depends on the specific rules and guidelines set by whoever is administering the assessment or activity.
If there are no explicit rules against using cheat sheets, then it may be permissible to use one. However, if there are rules against cheating of any kind, then using a cheat sheet would likely not be allowed.
How Do I Hide Cheat Sheets in Exam?
There are a few different ways that you can hide cheat sheets during an exam. One way is to use your clothing to cover up the cheat sheet. You can wear a jacket or a long-sleeved shirt that will cover up your arms and the cheat sheet.
Another way is to hide the cheat sheet in your lap and keep your hands over it so that the proctor cannot see it. If you are sitting at a desk, you can also put the cheat sheet under your legs or on your chair so that it is out of sight.
Why are Cheat Sheets Allowed?
There are a few reasons why cheat sheets are allowed in exams. First, they can provide a way for students to organize their thoughts and information. Second, they can help students remember important information that they might otherwise forget.
Finally, cheat sheets can serve as a valuable resource during exams, allowing students to focus on the material rather than worry about forgetting something.
How Do You Make Cheat Sheets?
When it comes to making cheat sheets, there is no one-size-fits-all answer. Depending on the class and the material, you’ll want to tailor your cheat sheet accordingly. That said, there are some general tips you can follow to make sure your cheat sheets are effective.
Here are a few things to keep in mind when making cheat sheets:
1. Make them concise. No one wants a huge sheet of paper with tiny writing crammed onto it.
Be selective about what goes on your cheat sheet and only include information that you know you’ll need.
2. Organize them well. A well-organized cheat sheet is much easier to use than a messy one.
Use headings and subheadings to break up the information, and consider using different colors or highlighting key points so they’re easy to find during an exam.
3. Use diagrams and illustrations whenever possible. Not only do they help break up the text, but they can also be helpful in understanding complex concepts quickly during an exam.
If you’re worried about running out of time, draw simple stick figures or flowcharts – they don’t have to be perfect!
4. Don’t forget formulas and equations! One of the most important parts of many exams is being able to recall formulas and equations accurately under pressure – so make sure these are included on your cheat sheet (and that you practice using them ahead of time).
5 . Practice using your cheat sheet before the exam . This will help you get comfortable with finding information quickly during an exam situation, and will also help identify any areas where yourcheat sheet needs improvement .
How to find CHEAT SHEETS for ANY subject 😱😎 #cheatsheet #exams #revision #studying #studygram
Conclusion
If you’re stuck on a problem and don’t know how to solve it, a cheat sheet can be a lifesaver. But where do you find them? Here are some tips.
First, try a search engine. Type in the name of the software or programming language you’re using, followed by “cheat sheet.” For example, if you’re having trouble with CSS, search for “CSS cheat sheet.”
If that doesn’t work, try looking for specific resources on websites dedicated to your software or language. For example, if you’re using WordPress, there are tons of WordPress-specific cheat sheets available online.
Finally, if you still can’t find what you’re looking for, try asking for help in a forum or chat room dedicated to your software or language.
There’s a good chance someone there will be able to point you to the perfect cheat sheet.
If you’re working with Arduino and you need to generate a PWM signal, there are a few things you need to know. This Arduino PWM cheat sheet will help you get started.
Pulse width modulation is a technique for varying the width of pulses in order to encode information.
A pulse width modulated signal has a duty cycle that is proportional to the amplitude of the message signal.
The duty cycle is the ratio of the pulse width to the period of the waveform. For example, if the period is 10 ms and the pulse width is 1 ms, then the duty cycle would be 10%.
Pulse width modulation (PWM) is a technique for varying the width of digital pulses. PWM signals are commonly used to control motors, LEDs, and other electronic devices.
The Arduino platform includes a built-in PWM function that can be used to generate PWM signals.
This article provides a quick overview of how to use the Arduino PWM function to generate digital pulses.
The Arduino Uno has three built-in PWM outputs:
PIN 9 – OC1A: Timer/Counter1 Output Compare A Match Output
PIN 10 – OC1B: Timer/Counter1 Output Compare B Match Output
Arduino Pwm Frequency
If you’ve ever wanted to know how to change the frequency of an Arduino’s PWM pins, this is the tutorial for you! In this guide, we’ll go over everything you need to know about setting up and adjusting the frequency of your PWM pins. By the end of this guide, you’ll be a PWM expert!
So what exactly is PWM? PWM stands for Pulse Width Modulation. It’s a technique used to create digital signals that mimic analog signals.
When it comes to Arduino boards, using PWM allows you to control the brightness of LEDs, the speed of motors, and more.
Now that we know what PWM is, let’s talk about how it works on Arduino boards. All Arduino boards have at least one pair of PWM-capable digital pins.
These are typically marked with a “~” symbol next to them. For example, on the popular Arduino Uno board, pin 9 is a PWM pin.
P WM works by sending rapid pulses of power to a device connected to one of these special pins.
The width of each pulse (measured in milliseconds) determines how much power is delivered overall. For example, if we set our pulse width to 1 millisecond (ms), then we’re delivering full power half the time and no power half the time – like flipping a switch rapidly back and forth between ON and OFF. However, if we make our pulse width shorter – say 0 .
5 ms – then we’re effectively reducing the amount of time that full power is being delivered, which translates into less overall power being used. This can be useful for controlling things like LED brightness or motor speed .
It’s also worth noting that most devices will operate normally even if they only receive partial power from PWM .
So if your goal is simply to dim an LED , for example , then you don’t need to worry about getting your pulse widths perfect – any value in between 0 and 1 ms will work just fine .
Now let’s talk about how we can change the frequency of our PW M signal s . By default , most Arduinos have their PW M frequencies set t o around 490 Hz (hertz). This i s usually plenty f or m ost applications , but there are times when yo u might want t o adjust it . For example , some motors run better at high er frequencies while others may produce unwanted noise at lower frequencies .
Credit: store-usa.arduino.cc
What is Arduino Pwm
Arduino PWM is a technique for getting digital output from the microcontroller to produce an analog signal. PWM stands for Pulse Width Modulation, and it is a method used to encode a signal onto a pulse train. The duty cycle of the pulses controls the average voltage that is outputted from the Arduino.
Pulse width modulation is commonly used in motors because it allows for control of both the speed and torque. By changing the duty cycle, you can change how long the motor is on each cycle, which changes how fast it rotates. You can also change the amount of torque by changing the amplitude of the PWM signal.
There are many other uses for PWM signals outside of just motors. LEDs can be dimmed using PWM signals, as well as servos controlled to specific positions. One common use for Arduino PWM pins is controlling sensors like thermal cameras or distance sensors.
By Varying the Ratio of On-Time to Off-Time, You Can Create Any Output Level between 0V And 5V from a Digital Pin
If you want to control the voltage output from a digital pin on an Arduino, you can do so by varying the ratio of on-time to off-time, also known as the duty cycle. By doing this, you can create any output level between 0V and 5V.
The amount of time that the digital pin is ON versus OFF is what determines the voltage output.
For example, if the digital pin is ON for 50% of the time and OFF for 50% of the time, then the average voltage output will be 2.5V. However, if the digital pin is ON for 90% of the time and OFF for 10% of then time, then the average voltage output will be 4.5V.
You can use this technique to create a simple Pulse Width Modulation (PWM) signal on a digital pin.
PWM is a common method used to control motors and LEDs since it’s very efficient and allows for smooth dimming or fading effects.
To vary the duty cycle on an Arduino, you’ll need to use one of the timer interrupts. Timer interrupts allow you to execute code at specific intervals while your main program continues running in parallel.
Using a timer interrupt will give you more precise control over when each pulse starts and stops.
Overall, changing the duty cycle on a digital pin is a quick and easy way to produce different voltages levels from your Arduino board. This technique can be used for various applications such as LED fading or motor speed control.
How Does Pwm Work on Arduino
PWM or Pulse Width Modulation is a technique used to control the power output of electronic devices like motors. It works by rapidly switching the device on and off, creating a pulsing effect that can be varied to produce different levels of power output.
Arduino boards have built-in support for PWM, which means they can be used to control devices that require it without any extra components.
To use PWM on an Arduino, you simply need to connect the device you want to control to one of the board’s PWM-enabled pins.
There are two main things that determine the level of power output from a PWM signal: the duty cycle and the frequency. The duty cycle is the percentage of time that the signal is high (on) compared to the total time it is low (off).
For example, if the duty cycle is 50%, then the signal will be high for half of the time and low for half of the time.
The frequency is how often the signal switches from high to low (or vice versa). A higher frequency will result in a smoother pulse, while a lower frequency will make it more pronounced.
For most applications, a frequency between 1kHz and 10kHz is suitable.
You can set both the duty cycle and frequency of a PWM signal using Arduino’s analogWrite() function. This function takes two parameters: The first is the pin number you want to output the signal on, and second is an integer between 0 and 255 that represents how much power you want it to have.
For example, let’s say we want to create a 50% duty cycle signal on pin 9 with afrequency of 1kHz. We would do this by calling analogWrite(9, 128); // sets pin 9to 50% power at 1kHz . Note that we don’t needto specify any units for either parameter – everythingis taken care of internally by Arduino.
The Longer the On-Time Compared to the Off-Time, the Higher the Average Voltage Will Be, And Vice Versa
Pulse width modulation is a technique used to encode data in an electrical signal. The width of the pulses correspond to the amplitude of the signal, and the spacing between pulses corresponds to the frequency. Pulse width modulation is commonly used to transmit digital data over long distances, or to control devices that require a precise amount of power, such as motors or LEDs.
The average voltage of a pulse width modulated signal can be controlled by changing the ratio of on-time to off-time (duty cycle). For example, if the on-time is twice as long as the off-time, the average voltage will be double what it would be with an equal on-time and off-time. This relationship holds true regardless of the duty cycle; if the on-time is 10 times longer than the off time, then the average voltage will be 10 times higher.
This principle can be used to create dimmable LED light bulbs. By varying the duty cycle of a PWM signal, it’s possible to control how much power is delivered to an LED, and therefore how bright it appears.
What is Duty Cycle
A duty cycle is a measure of the time that a particular device or system is in use. It is typically expressed as a percentage of the total time that the device or system is operational. For example, if a light bulb has a duty cycle of 50%, this means that it is on for half of the time that it is in operation.
Duty cycles are important to consider when designing devices and systems because they can impact the overall efficiency and performance.
For Example, If a Signal Has a Period of 10Ms And It is On for 1Ms Then Its Duty Cycle Would Be 10%
Duty cycle is a measure of the proportion of time for which a signal is active, or “on”, compared to the total time it is active. For example, if a signal has a period of 10ms and it is ON for 1ms then its duty cycle would be 10%. The duty cycle is represented as a percentage.
สอนเปลี่ยนความถี่ PWM บน Arduino (How to change PWM frequency in Arduino)
Conclusion
Pulse width modulation is a powerful technique for controlling analog circuits with a microcontroller’s digital outputs. PWM signals are like analog voltage signals, but the average value of the signal is controlled by changing the duty cycle. This can be used to control the brightness of an LED, the speed of a motor, or any other behavior that varies linearly with voltage.
The Arduino has a built-in function called “analogWrite” that can be used to generate PWM signals on any of its digital output pins.
In this blog post, we’ll take a look at what PWM is and how it works, before moving on to some examples of how to use it with an Arduino.
There are a lot of different Android development cheat sheets out there. Which one should you use? It really depends on what you’re looking for and your level of experience.
If you’re just starting out, something basic like the Official Android Developer Cheat Sheet might be a good place to start. But if you’re looking for something more comprehensive, check out the CheatSheet from CommonsWare.
There’s no denying that Android is one of the most popular mobile operating systems on the market today. And for good reason! Android is incredibly user-friendly and customizable, making it a great choice for both first-time smartphone users and experienced techies alike.
If you’re interested in developing Android apps, you’ll need to get acquainted with the platform’s unique set of tools and technologies. To help you get started, we’ve put together this handy cheat sheet with all the essential information you need to know about Android development.
Android SDK: The Android SDK (software development kit) is a set of tools that lets you develop Android apps.
It includes a debugger, libraries, a device emulator, documentation, sample code, and tutorials. You can download the Android SDK from the Android Developer website.
Java SE Development Kit (JDK): In order to use the Android SDK, you’ll need to have the Java SE Development Kit (JDK) installed on your computer.
You can download it for free from Oracle’s website.
Android Studio: This is the official IDE (integrated development environment) for developing Android apps. It comes with everything you need to get started, including the ability to create virtual devices so you can test your app on different screen sizes and hardware configurations.
You can download it for free from Google’s developer website .
Gradle: Gradle is a build tool used byAndroid Studio that lets you automate tasks such as compiling code, running tests ,and packaging apps .You don’t need to install Gradle separately–it comes bundled withAndroid Studio .
Eclipse IDE: While not officially supported by Google , many developers prefer using Eclipse when developing Android apps .It has excellent support for integrated testing and debugging , which can save you a lot of time during development .You can download Eclipse from its official website .
The Android 10 Cheat Sheet
Android App Development Cheat Sheet Pdf
If you’re looking for a quick and easy reference guide for Android app development, look no further than this Android App Development Cheat Sheet PDF. This one-page PDF covers all the basics of developing Android apps, from setting up your development environment to deploying your app on the Google Play store.
Whether you’re a beginner or an experienced Android developer, this cheat sheet is a valuable resource that you can keep handy as you work on your next app project.
So bookmark this page and keep it handy the next time you need a refresher on any of the topics covered herein!
Credit: forums.bignerdranch.com
What are the Basics of Android Development?
Assuming you want a high-level overview of Android development:
Android is a Linux-based, open source operating system for mobile devices created by Google. Android enables developers to create highly functional mobile applications that take full advantage of all a handset has to offer.
An Android application consists of several components each with its own purpose.
The first component is the activity which represents a screen where the user interacts with the app; think of it as a window in a desktop application. Activities can be started or stopped and they can communicate with other activities.
A service is like an activity but without a user interface. It runs in the background to perform long-running operations or to perform work for remote processes.
Broadcast receivers handle communications from the system and other applications, allowing your application to respond when certain events occur, such as receiving an SMS message.
Content providers manage access to data stored by the application and make this data available to other applications on request. SQLite databases are commonly used in conjunction with content providers.
These are just some of the basic building blocks that come together to form an Android app.
How Can I Practice Android Development?
If you want to practice Android development, there are a few things you can do. First, download the Android SDK and install it on your computer. Then, create a new project in Eclipse or another IDE and start coding.
You can also find many tutorials online that will walk you through the process of creating an Android app. Finally, consider joining a community of other Android developers so that you can get feedback on your work and collaborate with others.
Is Android Dev Easy?
If you’re thinking about becoming an Android developer, you might be wondering if it’s a difficult process. The short answer is that yes, developing for Android can be challenging, but it’s also relatively easy to get started.
Of course, the level of difficulty will depend on your experience and expertise.
If you’re already familiar with Java and other programming languages, then you’ll likely find Android development to be fairly straightforward. However, if you’re new to coding, then you might find the learning curve to be a bit steeper.
In general, developing for Android requires a good understanding of Java and the Android SDK.
You’ll need to be able to use tools like Eclipse or Android Studio, and it’s helpful to have some experience with XML. Additionally, because Android devices come in so many different shapes and sizes, it’s important to know how to design your app to be compatible with as many devices as possible.
Overall, thoughAndroid development is not overly difficult – especially if you’re already familiar with coding in other languages.
Of course, as with anything else in life, practice makes perfect; the more time you spend coding for Android , the easier it will become .
How Can I Improve My Android Development Skills?
There is no one-size-fits-all answer to this question, as the best way to improve your Android development skills will vary depending on your current level of expertise and experience. However, there are a few general tips that can help you to improve your skills in this area:
1. Stay up to date with the latest trends and developments in the Android ecosystem.
This will help you to identify new features and capabilities that you can utilise in your own apps, and keep you abreast of changes that could impact your existing app development work.
2. Get involved in the Android developer community. There are many online forums and groups dedicated to Android development, where you can exchange ideas and advice with other developers.
Getting involved in these communities can not only help you to learn from others, but also allow you to share your own knowledge and expertise with others.
3. Experiment! One of the best ways to learn is by doing, so don’t be afraid to experiment with different techniques and approaches when developing Android apps.
You may not always get it right first time round, but trial and error will ultimately help you to hone your skills as an Android developer.
Conclusion
If you’re new to Android development, this cheat sheet is for you. It covers the basics of setting up a development environment and creating a simple Android app.
You’ll need to install the Android SDK and set up your development environment before you can start developing apps.
The SDK provides the tools and APIs necessary to build, test, and debug Android apps. Once you’ve set up your development environment, you can create a new project in Eclipse or Android Studio.
When creating a new project, you’ll need to specify the target API level for your app.
The target API level is the version of Android that your app is designed to run on. You can choose any API level, but it’s best to target the latest version of Android possible.
Once you’ve created a new project, you can add code to it in the form of Activities.
Activities are like screens in an app, and they contain the code that defines what appears on those screens and how users interact with them. Each Activity has its own Java class file where you can write your code.
To run your app on a device or emulator, right-click on your project in Eclipse or Android Studio and select Run As >Android Application .
This will launch the debugger and deploy your app to the selected device or emulator. If everything goes well, you should see your app running on the device or emulator!
If you’re looking for a quick and easy way to prepare for your next Android interview, this cheat sheet is for you. It covers all the essential topics that you need to know, from Android architecture to common programming challenges. Whether you’re a beginner or an experienced Android developer, this cheat sheet will help you brush up on your skills and ace your interview.
If you’re looking for a quick and easy way to prepare for your next Android interview, look no further than this cheat sheet! We’ve compiled a list of the most common questions asked in Android interviews, along with sample answers to help you ace the interview.
1. Tell me about your experience developing Android applications.
I have experience developing Android applications both in Java and Kotlin. I am familiar with the Android SDK and have used various libraries and frameworks to build my applications. I have also published one app on the Google Play Store.
2. What are some of the challenges you faced while developing Android applications?
One of the main challenges I faced was dealing with different screen sizes and devices. Another challenge was keeping up with the ever-changing trends in the Android world.
However, I enjoyed overcoming these challenges and learning new things along the way.
3 .What is your favorite thing about developing Android applications?
My favorite thing about developing Android apps is that there are no limits to what you can create. You can really let your imagination run wild when building an app for this platform. Additionally, I love how active and helpful theAndroid community is–there’s always someone willing to lend a helping hand or offer advice .
Most 🔥IMP interview question 🙄- ViewModel internal working | Android Cheat sheet
Android Interview Questions And Answers
If you’re looking for a job that involves Android development, you’re in luck. The demand for Android developers is growing rapidly, and there are plenty of opportunities out there.
Of course, before you can land one of these coveted jobs, you’ll need to ace the interview.
And that means being prepared to answer some tough questions.
To help you out, we’ve compiled a list of common Android interview questions and answers. These questions will cover everything from your experience with the Android platform to your understanding of common design patterns.
So whether you’re a seasoned pro or just getting started with Android development, make sure you brush up on your interview skills with this helpful guide.
Credit: data-flair.training
What Do I Need to Know for an Android Interview?
An Android interview can be a little daunting if you’re not familiar with the operating system, but don’t worry! We’ve got you covered. Here are a few things you should know before your interview:
– Android is an open source operating system developed by Google.
– It is based on the Linux kernel and designed for touchscreen mobile devices such as smartphones and tablets.
– Android has a large user base and a rich ecosystem of apps and services.
– The latest version of Android is 7.0 Nougat, released in 2016.
Now that you have a basic understanding of what Android is, let’s move on to some potential interview questions. These could include:
– What experience do you have with developing for Android?
– What are some of the unique challenges that come with developing for this platform?
– Which versions of Android are you most familiar with?
– Tell us about a time when you had to debug an issue on this platform.
– What do you think makes a great Android app?
Be sure to brush up on your knowledge of Java (the language most often used for developing Android apps) and the various SDKs available before your interview.
If you can showcase your expertise in these areas, along with your passion for developing great apps, you’ll be sure to impress your interviewer!
What Should Be Included in a Cheat Sheet Interview?
In order to ace your next interview, it is important to be prepared. This means having a cheat sheet of sorts that you can refer to during the interview process. Here are some things that should be included in your cheat sheet:
1. A list of your key strengths and weaknesses. Be honest with yourself here – knowing your weaknesses will help you prepare for questions about them.
2. A list of key achievements from previous roles, both professional and personal.
Think about any major projects you spearheaded or goals you met that made a positive impact on those around you.
3. Examples of times when you utilized teamwork successfully or went above and beyond what was expected of you in a previous role. These examples will show the interviewer that you are capable of more than just meeting the bare minimum requirements for a job.
4. Any difficult questions that you anticipate the interviewer may ask, along with well-thought-out answers for each one. By preparing for tough questions ahead of time, you’ll come across as confident and poised during the actual interview itself.
What is Android Studio Interview Questions And Answers?
Android Studio is the official IDE for Android development, based on IntelliJ IDEA. On this page, we’ll cover some of the most common and important Android Studio interview questions so that you can be prepared for your next big interview.
1. What is Android Studio?
Android Studio is the official IDE (integrated development environment) for developing Android apps. It’s based on IntelliJ IDEA and offers a powerful code editor, Gradle-based build system, support for multiple devices, emulator integration, and more.
2. How is Android Studio different from Eclipse?
Eclipse was previously the most popular IDE for Android development but has since been replaced by Android Studio as Google’s recommended tool. Some of the key differences between the two include:
– Gradle-based build system vs Ant-based in Eclipse
– Native support for multiple devices vs third-party plugins in Eclipse
– Built-in support for Google Cloud Platform tools vs third-party plugins in Eclipse
3. What are some of the features of Android Studio?
Some of the key features of Android Studio include:
– Code editing (with auto-completion and refactoring)
– A flexible Gradle-based build system
– Support for multiple devices
– Emulator integration
4. How do I install Android Studio?
You can download and install Android Studio from here: https://developer.android.com/studio/. Once it’s installed, you can launch it by double clicking on the icon or running “studio64” from a terminal window if you’re using Linux. 5. What are some tips for getting started with developing in Android Studio?
Here are a few tips to help you get started with developing inAndroid StudiO:
– Start by creating a new project from scratch or importing an existing one from Eclipse ADT or anotherIDEAproject . If you’re starting from scratch , be sure to select Empty Activity when prompted to choose a project template . This will give youa basicapp structurewith no extra code or resourcesto clutter things up .
How Do You Prepare an Interview Sheet?
When you are in the process of conducting an interview, it is important to have an interview sheet prepared. This will help you to keep track of the questions that you want to ask, as well as the answers that you receive. Here is a step-by-step guide to preparing an interview sheet:
1. First, make a list of the topics that you want to cover during the interview. These can be general topics, or specific questions that you want to ask.
2. Once you have your list of topics, start brainstorming potential questions for each topic.
Write down any and all questions that come to mind – even if they seem silly or irrelevant at first.
3. Once you have a good selection of questions, start narrowing them down. Eliminate any questions that are not relevant to the topic, or that could be easily answered with a simple yes or no response.
Try to focus on open-ended questions that will encourage your interviewee to elaborate on their answers.
4. Once you have your final selection of questions, it’s time to start filling out your interview sheet template. Include space for each question, as well as room for notes and comments next to each answer.
If possible, try to leave some blank space on the page so that you can add additional information later on if needed.
Conclusion
If you’re preparing for an Android interview, this cheat sheet is a must-have. It covers all the key concepts you need to know, from Android architecture and components to common design patterns. Plus, it includes a list of sample questions to help you ace your interview.
Android Studio is a powerful Integrated Development Environment (IDE) created by Google. It is based on the JetBrains IntelliJ IDEA platform and offers many features specific to developing Android applications. This cheat sheet will help you get started with Android Studio and covers the most important shortcuts and tips.
If you’re new to Android Studio, this cheat sheet will be a handy reference as you begin learning about all of the features it has to offer. If you’re an experienced developer, you may find some of the tips and tricks helpful as well. Either way, we hope this cheat sheet helps you get the most out of Android Studio!
If you’re new to Android Studio, or if you’ve been using it for a while but still feel like you could use a little help getting around, then this cheat sheet is for you. It covers all the basics of using Android Studio, from creating a new project to running your app on a device. Keep this handy as you start exploring all that Android Studio has to offer!
Creating a New Project:
To create a new project in Android Studio, select “File > New > New Project.” This will open the “New Project” wizard.
Give your project a name and choose where you want it to be saved. Then, select the type of activity you want to include in your project. For example, if you want to create an app with a main activity and several other activities that users can navigate to, choose “Empty Activity.”
Once you’ve made your selections, click “Finish” and Android Studio will generate your new project.
Running Your App:
Once your project has been created, select “Run > Run ‘app’” from the menu bar at the top of the screen.
In the popup window that appears, select the device that you want to run your app on. If you don’t have any devices configured, follow the instructions here to set up an emulator or connect an actual device. Once everything is set up properly, hit “OK” and Android Studio will launch your app on the selected device!
The Android 10 Cheat Sheet
Android Studio Cheat Sheet Pdf
If you’re an Android developer, then you know how important it is to have a good development environment. And if you’re looking for a good development environment, then look no further than Android Studio.
Android Studio is Google’s official IDE for Android development, and it comes with a whole bunch of features that make it ideal for developing Android apps.
But with so many features, it can be tough to keep track of everything. That’s why we’ve put together this handy cheat sheet that covers all the basics of using Android Studio.
This cheat sheet includes information on the following topics:
• Setting up your development environment
• Creating a new project in Android Studio
• Adding activities to your project
• Using the Layout Editor tool
And much more! So whether you’re just getting started with Android Studio or you’re looking for a quick reference guide, be sure to check out ourAndroid Studio Cheat Sheet.
Credit: www.pinterest.com
What is Android Studio Cheat Sheet
If you’re like me, you probably spend a lot of time in Android Studio. It’s a great IDE for Android development, but it can be overwhelming at times. There are so many keyboard shortcuts and menus that it’s hard to keep track of everything.
That’s where the Android Studio Cheat Sheet comes in handy.
This cheat sheet covers the most important keyboard shortcuts and menus in Android Studio. It’s designed to help you boost your productivity and get the most out of the IDE.
Here are some of the things you’ll find on the cheat sheet:
– Keyboard shortcuts for common actions such as creating a new file or class, compiling your code, running your app, and more.
– A list of useful menu items, including those for working with refactorings, code inspection, debugging, and more.
– A summary of what’s new in Android Studio 3.0, which was recently released. This includes information on the updated UI designer, Instant Run improvements, support for Kotlin development, and more.
Where Can I Find Android Studio Cheat Sheet
There are a few different places you can find an Android Studio Cheat Sheet. One place is the Android Developers website. Another place is the Android Studio website.
Finally, there are a number of websites that offer cheat sheets for various programming languages, including Android Studio.
How Can I Use Android Studio Cheat Sheet
Assuming you would like a cheat sheet for Android Studio:
Below is a link to a PDF file that contains a cheat sheet with shortcuts, tips & tricks for Android Studio:
Conclusion
If you’re new to Android Studio, then this cheat sheet is for you. It covers the basics of using the IDE, including how to create and run projects, edit code, and debug your app. Once you’ve got the hang of it, you’ll be well on your way to creating amazing Android apps.
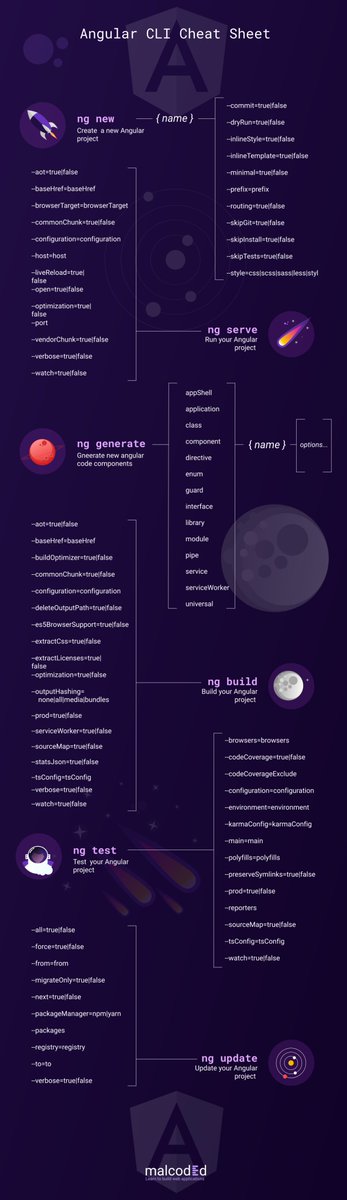
The Angular Cli Cheat Sheet can help you quickly learn and use the Angular command line interface. This cheat sheet includes a list of common commands, options, and arguments for the Angular CLI. It also covers some less frequently used commands that can be useful in advanced scenarios.
If you’re looking for a quick and easy way to get up and running with Angular, look no further than the Angular CLI. The CLI is a command line interface that makes it easy to scaffold an Angular application. In this post, we’ll provide a handy cheat sheet with all of the most common commands you’ll need to use.
Angular 12 tutorial #6 Angular CLI & important Commands
Angular Cli Cheat Sheet Pdf
If you’re looking for a quick and easy reference to all of the most important commands in the Angular CLI, look no further than this Angular CLI Cheat Sheet PDF. This PDF contains everything you need to know about the CLI, including how to create new projects, generate code, and run tests. Save this PDF to your desktop or print it out so that you can keep it handy whenever you need a reminder on how to use the CLI.
Credit: twitter.com
What are Angular Cli Commands?
Angular CLI is a command-line interface tool that you use to initialize, develop, scaffold, and maintain Angular applications. You can use Angular CLI to generate different types of Angular artifacts like Components, Directives, Pipes, Services etc.
Angular CLI also provides a development server so that you can test your Angular application without setting up a web server.
Some of the most commonly used Angular CLI commands are:
ng new : This command creates a new Angular project with all the required configuration files.
ng serve : This command builds and serves your application on http://localhost:4200/.
ng build : This command builds your application in the production mode. The output is generated in the /dist folder.
ng test : This command runs unit tests in your project using KarmaJS.
ng e2e : This command runs end-to-end tests in your project using ProtractorJS.
What is Angular Cheat Sheet?
An Angular cheat sheet is a reference guide for Angular developers. It includes all the essential information about Angular, such as its features, syntax, and usage. This cheat sheet can be used as a quick reference when you need to look up something specific about Angular.
What is Dry Run in Angular?
Dry run is a feature in Angular that allows you to test your application without running it. This is useful for making sure that your application runs correctly before you deploy it. Dry run will also check for errors in your code and dependencies.
How Do You Solve Error This Command is Not Available When Running the Angular Cli Outside a Workspace?
If you’re getting the error “this command is not available” when running the Angular CLI outside a workspace, it’s likely because you’re using an old version of the CLI. The latest CLI versions require that you be inside an Angular workspace in order to use the CLI.
To solve this, either create an Angular workspace or update your CLI to the latest version.
Conclusion
The Angular CLI is a command-line interface tool that helps you initialize, develop, scaffold, and maintain Angular applications. It’s a great tool for getting started with Angular and for helping to keep your project organized. This cheat sheet provides an overview of the most commonly used commands in the Angular CLI.